This post may contain affiliate links. Please read our disclosure policy.
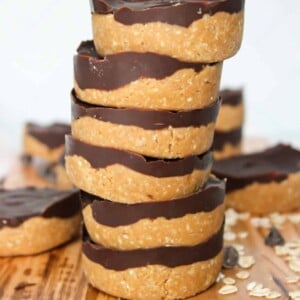
These no bake peanut butter oat cups are delicious, super easy to make, and only use four ingredients! You’ll top a creamy peanut butter base with melted chocolate to create a sweet treat with major peanut butter cup vibes. If you’re a peanut butter lover, don’t miss this one.
This post may contain affiliate links.

Why you’ll love these
First of all, is there anything better than a peanut butter and chocolate combination? If you’ve got a sweet tooth, these chocolate peanut butter cups are the perfect no bake treats.
As a Registered Dietitian, I believe that all foods fit, and I don’t expect you to abandon regular peanut butter cups forever after trying this peanut butter chocolate. But, I also think it’s fun to make a sweet treat that has a little bit more going on nutritionally sometimes.
These no bake chocolate peanut butter oat cups are made with four simple, nutritious ingredients: whole grain oat flour (hello fiber!), peanut butter full of healthy fats, maple syrup, and chocolate chips. A delicious treat with health benefits too? I’m always on board for that.
Plus this is a super easy recipe. They’re easy enough for anyone in your family to help with!

Ingredients you’ll need
The best part about these is the super simple ingredients. Here’s what you’ll need for these no bake peanut butter cups.
- Oat flour: I prefer to make my own oat flour using rolled oats and processing them finely in my food processor. Rolled oats are generally safe to eat because they’re steamed before being processed, versus some store-bought oat flours may not be. If you’re at higher risk of foodborne illness or have a sensitive stomach, you may want to heat treat the oats first in your oven.
- Peanut butter: Any peanut butter or nut butter will work here! It’s up to you if you want to use one that’s a “natural” peanut butter with just peanuts and salt, or a standard brand like Skippy. Both will work.
- Pure maple syrup: Personally I like the deep flavor that maple syrup brings to these, but you can use honey too.
- Chocolate chips: I usually use semi-sweet chocolate chips, but you can use dark chocolate chips, white chocolate chips, milk chocolate chips, or any others that you like.
Coconut oil: This is an optional 5th ingredient, but adding just a teaspoon or so of coconut oil can help the chocolate chips to melt and harden smoother.
Step-by-step instructions
- Add your peanut butter and maple syrup to a medium sized microwave-safe bowl and microwave for 40-60 seconds. Stir thoroughly until peanut butter and maple syrup is completely combined.


- Next, slowly add the oat flour to the bowl and mix well (it should take some effort to mix!). You can also transfer to a standing mixer to do the work for you. The mixture should be very thick, but easily moldable.

- Prepare a muffin pan by spraying with some oil or lining with cupcake liners. Or, use a silicone muffin pan as shown here for the easiest method. You can also make them in a mini muffin silicone pan or mini muffin tin with paper liners. Scoop the peanut butter oat mixture evenly into the muffin pan and press down with your fingers.


- In a microwave-safe small bowl, add chocolate chips and coconut oil. Heat in 30 second increments until chocolate is completely melted and smooth. Stir with a spoon in between microwave sessions.
- Pour a layer of chocolate into each muffin hole and smooth the top with the back of a spoon. Optional: Sprinkle flaky salt, sprinkles, or mini chocolate chips on top of the chocolate layer before the chocolate hardens.
- Refrigerate for 2-3 hours to let set completely. Carefully remove them from the muffin pan, liner, or silicone pan. Store in an airtight container for up to 5 days for best freshness. Since they’re not baked and use fresh ingredients like maple syrup, store them in the refrigerator over room temperature.

Recipe FAQ
Can I use almond butter?
Yes, you can use almond butter, sunflower butter, or even cashew butter for these. Any type of nut butter will work fine.
How do I make oat flour?
You can make your own oat flour using rolled oats. Use your food processor to process them on high until the texture is super fine. I prefer to make my own flour using rolled oats because rolled oats are steamed before they’re processed, making them safe to eat raw
Can I use any flour?
Since this is a no bake recipe, you can’t use regular flour unless it’s heat-treated first for food safety. You can sub in any flour that can be eaten raw, like almond flour. Just keep in mind that the texture and taste of the peanut butter mixture will change depending on which flour you use.
Disclaimer: According to most experts, raw oats are safe to eat unlike wheat flour because they are steamed before they’re cut, rolled and flaked. With that being said, be mindful of consuming raw ingredients if you are at increased risk for food borne illness or you have a sensitive stomach.
You’ll also love:
Easy Chocolate Date Bark with Peanut Butter (Viral Recipe)
Viral Cottage Cheese Cookie Dough (High-Protein)
Pumpkin Protein Balls (No Bake Energy Bites)
No Bake Peanut Butter Oat Cups
Ingredients
- 1.5 cups peanut butter
- 1.5 cups rolled oats, processed finely in a food processor to make oat flour
- 1/4 cup maple syrup
- 1 cups chocolate chips
- 1 tsp coconut oil, optional
Instructions
- Blend oats in a high-speed blender or food processor to make oat flour.
- Add your peanut butter and maple syrup to a medium sized microwave-safe bowl and microwave for 40-60 seconds. Stir thoroughly until peanut butter and maple syrup is completely combined.
- Next, slowly add the blended oats to the bowl and mix well (it should take some effort to mix!). You can also use a food processor to do this. The mixture should be very thick, but easily moldable. If the mixture looks way too dry and crumbly, add more maple syrup or PB (about a teaspoon extra at a time). You can also add 1/4-1/3 cup of pumpkin puree for a moister cup.
- Prepare a muffin pan by lining with cupcake liners. Or, use a silicone muffin pan as shown here for the easiest method. Note: These will be difficult to remove from your muffin pan without liners. You can also make them in a mini muffin silicone pan or mini muffin tin with paper liners.
- Scoop the peanut butter oat mixture evenly into the muffin pan and press down with your fingers.
- In a microwave-safe small bowl, add chocolate chips and coconut oil. Heat in 30 second increments until chocolate is completely melted and smooth. Stir with a spoon in between microwave sessions.
- Pour a layer of chocolate into each muffin hole and smooth the top with the back of a spoon. Optional: Sprinkle flaky salt, sprinkles, or mini chocolate chips on top of the chocolate layer before the chocolate hardens.
- Refrigerate for 2-3 hours to let set completely. Carefully remove them from the muffin pan, liner, or silicone pan. Store in an airtight container for up to 5 days for best freshness. Since they're not baked and use fresh ingredients like maple syrup, store them in the refrigerator over room temperature.
Notes
Nutrition information is automatically calculated and should only be used as an estimate.



These are a staple in our house! So good!
This recipe is so simple and easy to make, not to mention delicious! I’m not a big fan of oats but Jamie turned me into one with this recipe!
Thanks Aly!
Easy recipe and it turned out great!
My picky kids loved these for a quick, healthy snack!
Can these be frozen
I haven’t frozen them but my guess would be that it would freeze okay, just make sure they are fully defrosted before eating.
If I have oat flour, is the measure still 1.5 cups? Sorry dumb question.
I find that it is pretty similar/sometimes a little less but you can always start with a little bit less, like 1 1/4 cup and then add more if needed :).
Easy recipe and it turned out great!
Made these in a mini silicone muffin pan and they are so good! Super easy and filling too. The smaller size is great for my kids too.
I love making them in the mini silicone pan too!
Hi there, can’t wait to try! I was wondering about the servings size recommendations and nutritional info on this? Is there an estimated fiber, sugar, calorie amount possible here? Thanks!
Where can I find the nutritional value of this recipe? Thanks!
Just put mine in my macro tracking app and it came out to 145 cals, 4g protein, 10 g fat and 10 g carbs. Didn’t use all the melted chocolate so kind of depends on how much you use but this should be a good estimate.